CHAPTER 0:
The last programmersComputing is slowly coming closer and closer to the masses. The computer is no longer just an electronic toy for the rich to play around with, but it is now an integral part of the office equipment that one needs to use. With the personal computer really getting personal, there are many things that can be done with the computer besides play games. And there are definitely two distinct types of computer users. Programmers or power users fall into one category, while everyday operators into another. It is easy for a power user to get down to the level of a operator, but the reverse is not necessarily so.
What is PeopleSoft
Realising this, software developers are now concentrating on developing more ‘wholesome’ software packages. Programs that can be deployed immediately, and yet have enough of flexibility for modification too. PeopleSoft is one such company. Like SAP, Germany, it has an Enterprise Resource Planning (ERP) application with readymade modules that can be deployed in a short span of time. Unlike SAP, which is only now beginning to change and get more graphical and user oriented, PeopleSoft has been developed from the start around a Graphical User Interface (GUI) and has many modules that can be put to work almost at once. The better and simpler the graphical user interface is, the faster is a program accepted by the masses. PowerBuilder, Visual Basic, Visual C++ etc, are all examples of successes. These are only tools however to get a task done, they did not offer complete solutions.
As the term ERP suggests, such applications are expected to help a company manage its resources. The problems associated with doing this are plentiful. One of the greatest problems a company faces is the long lead-time required to implement any such program. Deploying any computerised management system across a company takes more time than companies can really afford. By the time the implementation is completed, the original definition or the procedures the company uses will have changed.
Who is this book for
Happily PeopleSoft changes all this. This program, like others in the same category, comes with a set of preprogrammed modules that can be used right away or at least with little modification. Users can get the system up and working in months rather than years. Again, in most cases, it is easier for the company to change its business practices to meet the input requirements of the package rather than modify the package to suit the company. Modules supplied are usually based on the practices of the best companies in each field. Hence, unless a company finds that its method is somewhat better or there are some additional areas that are not covered by the program, there is little reason to reinvent the wheel.
Of course, everything is not a perfect fit at the first go. There is always some amount of modification required. For this reason, PeopleSoft also has a set of tools to use with the rest of the application. With this toolkit, it is possible to change, modify and add in other routines or panels that are required by the user. It is this tool set that we will examine in detail. It will be used to build programs/applications that will merge and work with the rest of PeopleSoft seamlessly. At the end of the book you will be able to change the core of PeopleSoft on your own.
How to read this book
There are a few things that you will need to bear in mind as you read through the following pages. If you have programmed in any other Relational Database Management System (RDBMS) before, it would be a good idea to forget all that you have learned so far. If you choose not to do so, be sure that you pay close attention to some of the definitions along the way as the terms used will vary from what you currently know. We will clarify each term that sounds confusing and repeat some of the definitions from time to time.
Included at the end of the book, is a short glossary of what each term means. Throughout the book, there will be more than a hundred questions that may pop up about a number of options, buttons and other features that you see in PeopleSoft. Not all these questions are answered. Topics are explained purely on a need-to-know basis. Attempting to do more than that will only serve to confuse the reader. Rest assured, that there is no way in which you will be able to understand everything in PeopleSoft in just one go. Any book that purports to do this is an incomplete book. There are too many features provided with PeopleSoft, to explain in just one book. We encourage you to experiment along the way. This will help you understand the product better. What we can guarantee is that by the time you complete reading this book, you will have working examples of what you really can do in PeopleSoft
Conventions used
Understanding concepts
Computer programmers love adding a little bit of mystique to everything that they do. Simple terms are all of a sudden not so simple any more. Take ERP packages for example. There is much hype around the term, but it really defines nothing more than a huge database management system. The database is linked to computers all across the company with pretty looking screens for users to enter in data and for managers to get reports instantly. Different departments in the company know what are the orders on hand and the status too. A small change in one department may mean a major change in another. Manipulating, calculating and posting data to different places is all that the program does. The result of all this work is displayed on the terminals of managers or in printed form in board meetings. No matter which way one looks at things, all that ERP does is to move data around. Moving it around more efficiently is the key to getting more work done.
This is where PeopleSoft has chosen to be different from the other ERP packages. It changes some of the basic concepts programmers are used to and adds a lot more jargon to computing. Rather than define the final product first and then list its components, PeopleSoft requires the user to first create the basic components and then put them together to create the final product. For example, when putting together a car, designers first define what the car will or will not be able to do, then they define the parts that will make it up — the wheels, the engine, the outer shell etc. This may be fine when one is making a special type of car, or designing a brand new model totally. A disadvantage here is that it will take longer to develop each part to fit in. Designing an entire range that looks similar would take an age if all components have to be designed again.
However, change your perspective for a moment and think now of building an inexpensive range of cars or that you have to supply this new range in record time. Then the first thing to do is to build the parts — parts that will be common to all the cars. The only thing that will change, would be each car’s appearance. In a range of maybe six similar looking cars, two cars may use the same wheel type whereas the other four something different. Some cars that will make use of all the parts that are available, and others that use a lesser set or different parts totally.
And this is exactly the approach that PeopleSoft takes. It is easier to first define the components and then place the components together to get the final product. In case of databases, the smallest component is a field. The same fields are often used in many different tables. Rather than first define a table and then the field within it, PeopleSoft requires the user to first create the set of fields to be used. One can then define a table and place the fields into them. Creating a link in this manner makes it easier to update similar fields in multiple tables. All one has to do is to modify the base field and the change will then be reflected in all tables where the field is used. (You will learn later on that though this concept makes life sound rather simple, there is a lot more work involved in really getting things working.)
Another term that you will have to bear in mind is Record. In PeopleSoft, one defines records rather than tables. Placing fields in groups defines a record. Tables, which actually store data, get created later from the definition. Create an application panel to understand this fully. It will help, if you stay with the text and the figures that you see. This way, you will be able to note if you have done something wrong. We use a standard naming convention while learning so as to make the process easier. The objects names are defined by using the initial letters of the object. A numeral is appended to the object name to identify and allow for more similar objects. If this sounds like Greek, fear not, it will become clearer as you proceed.
Building your first PeopleSoft App
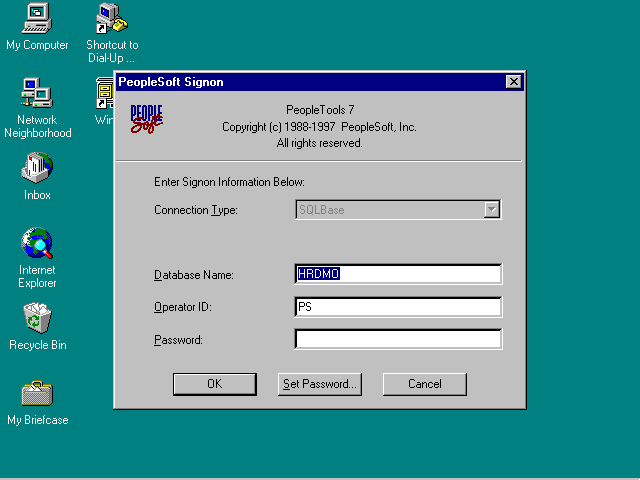
Run PeopleTools and connect to a database that you know you cannot do damage to. Or at least, does not have any critical data that you could possibly lose. If you follow instructions to the letter, any database will do as you will be able to delete your work. We used a copy of a database supplied by PeopleSoft called HRDMO, as you an see in fig.1
Fig.1: Starting up
If you did not start up in the Application Designer, click Go on the main menu, select PeopleTools and then select the Application Designer as you can see in fig.2. The screen should appear divided into three areas. The left pane in the Application Designer is the project window. This window keeps track of all the objects used in the current project. Any object that you create or add to the project appears here.
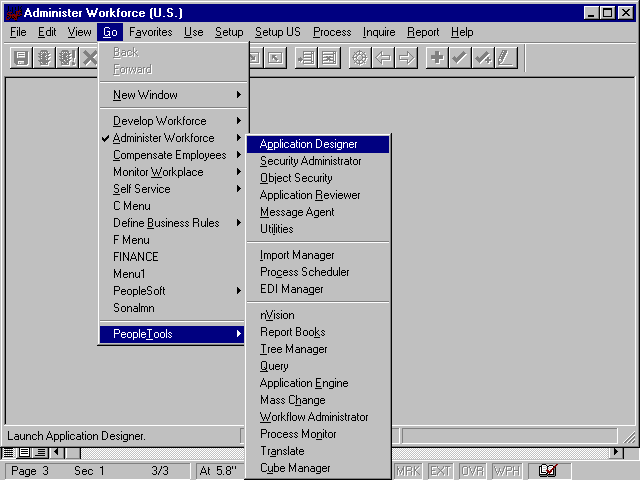
Fig.2: The Application Designer
It is possible to skip a couple of steps here and to place fields directly on panels. But it is better to actually create or place the fields or records for an application as a part of the project before using them. The project window can be closed by pressing Alt+0.
The window at the bottom is the report window. It displays all happenings in the project. A report on every task executed appears here. Reports on the successful creation of fields, records, panels, etc or execution errors, are shown here. This window can be hidden too, by pressing Alt+1.
If the window on the left is not empty, then the Application Designer has been used before. The Application Designer may start up with either of the two windows ‘missing’, or there may be an open project shown in the project window. In this case, select File | New | Project, as shown in fig.3, and click OK. The name that appears on the title bar should now state Untitled. To display or hide the windows, try the Alt key combinations.
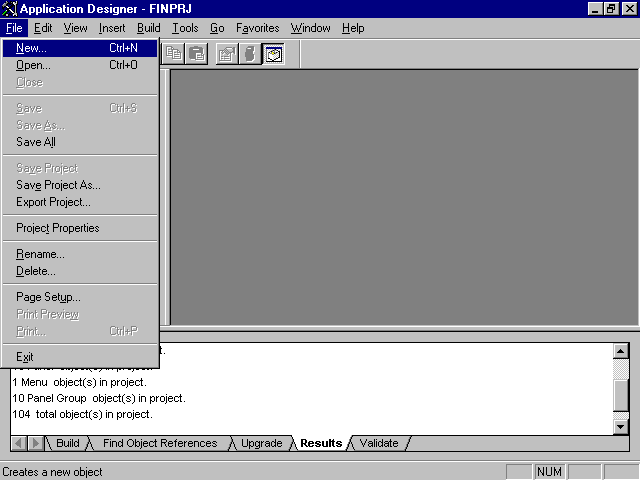
Fig.3: What object would you like to create?
Create your first field by clicking File | New and in the dialog box that appears, (like fig.4) select Field and click OK. As soon as this is done, another dialog box appears wherein the type of field to be created has to be entered. The default is Character, which is acceptable. Click OK and go on to yet another dialog box, where you have to give even more details. Since the field being created has already been defined as Character type, the Field Type is grayed. You now have to fill in the Field Length, a Long Name, Short Name and some other details that are not important right now.
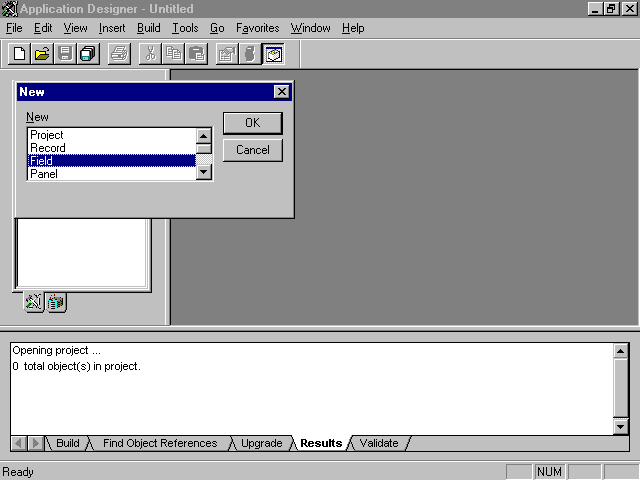
Fig.4: and what will be the New field type?
Set the field length to 10, or any other value. This does not matter as we will not be using the fields to place any data. Do not bother about Long and Short names, just label both the same — custid.
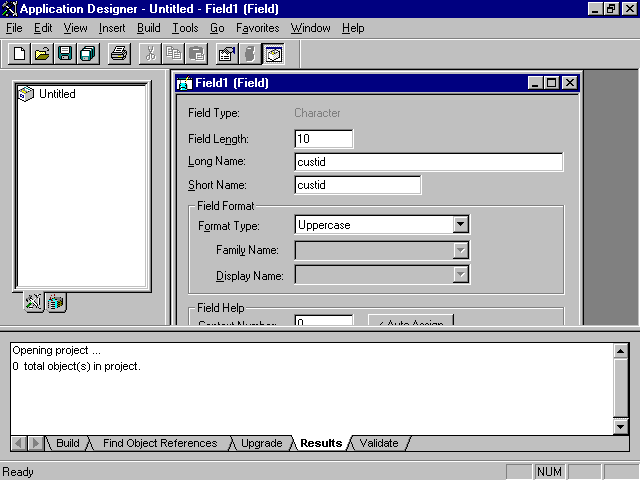
Fig.5: Setting the field values
A fast way to save and name the field you created is to click X on the top right corner of the Field window. As with any good application, any attempt to close a modified object without saving causes a reminder box to appear. Do so here and a similar warning box appears, asking for a confirmation. You can at this point save the field you created. Name the field A1FI1.
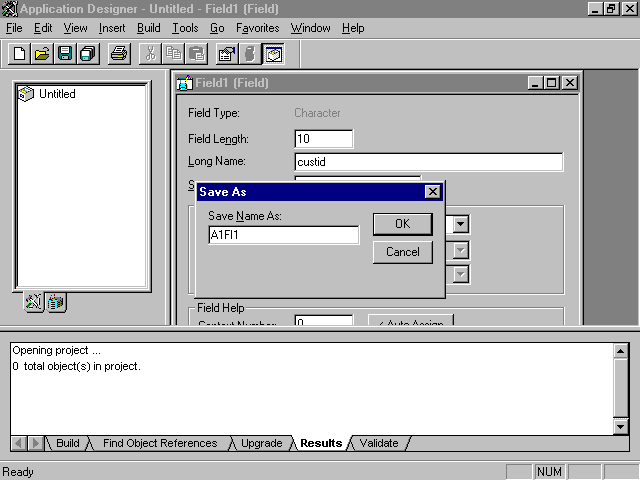
Fig.6: Save the field
If Application Designer has never been used so far, then you should have a problem on your hands just now. You saved the field and it disappeared into Never-neverland. There is no indication of what happened to the field at all. Fear not, the field is not lost. In fact, nothing is ever lost in PeopleSoft, it is just sometimes hard to find. You will learn as you go along, there are thousand places where PeopleSoft keeps tucking away things. It is more likely that you will get lost trying to figure what is where.
The first thing to do is to get the field back. Click File | Open and select Field in the dialog box that appears. Enter the name of the Field and click OK. The field will appear once more. From the main menu, select Insert | Current Object into Project as in fig.7. Keep watching the window pane on the left as this is where your field should appear. Notice the other two options that were available under the Insert menu — Objects into Project, and Project into Project. Using these options, one can skip opening the object before adding to the project.
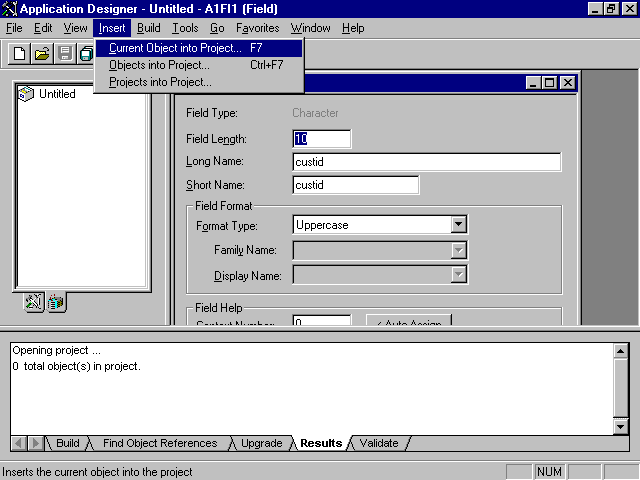
Fig.7: Inserting an object into a project
In fig.8, you see the project tree expanded. By default, each time an object is placed into the project, the branch collapses again and all one sees is the closed folder. By double-clicking the closed folder or clicking on the plus sign on its left, it is possible to expand that branch of the tree, which is what was done in the figure. This list will get added to as you will notice over the next few pages.

Fig.8: Field custid or A1Fl1 is now part of Untitled project
Saving the object does not clear it from the screen. You can either ignore it or close it by clicking on the X in the top right corner, which is why it is a better option to close and save the object simultaneously.
It is also possible to automate the insertion of objects into projects by making a small change to the configuration settings. Select Tools | Options to call the Options panel. The first group on this panel deals with Insert Object into Project, and by default, this is set to Manually. For the rest of the example, we will be creating objects and not selecting objects already created, hence change the setting to When object is modified and saved. Click OK to save this setting. From now on, each time an object is saved it will be added to the project pane on the left.
With one field created, it should not be hard to create another. This one will be called CUSTNAME. Try creating it yourself. Revise the steps in making a field appear in the project box. Click File | New | Field. This one is A1FI2. Set the field type to Character once more. Length set at 10. Save it and it will appear in the left window. You now have two fields. However, it is not possible to do anything with these fields unless they are a part of a record.
This is a good time to remind you that a record in PeopleSoft terminology, actually means a table definition. RDBMS programmers who have talked tables all this while will now have to relearn everything. Records in PeopleSoft mean tables and not rows or a data entry.
Creating records is as easy as creating fields. File | New | Record, OK, and you have just created a blank record definition. As you can see in Fig.10 it has a set of columns, which you cannot key anything into. There is no great skill required to place fields into records. You could do either of two things — open the Fields folder, then select the field and drag it over to the record panel. Drop it in and the field is now a part of the record. If, however, you are not adept with moving your mouse around, you could use the menu to get the same job done. Select Insert | Field… and specify the field that you want to include in the record. Click OK and the field is placed.
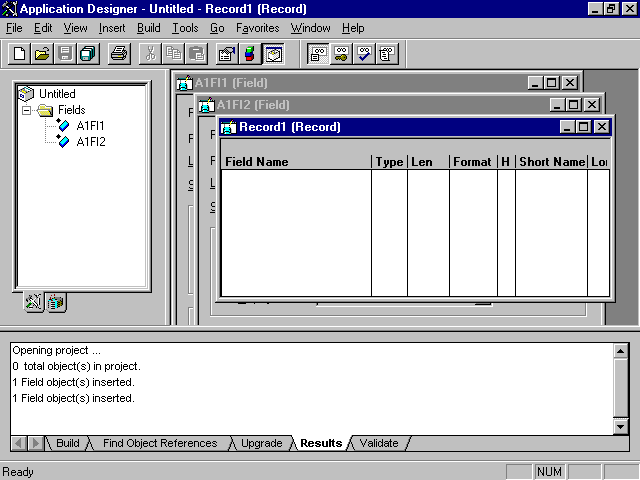
Fig.10: Creating records
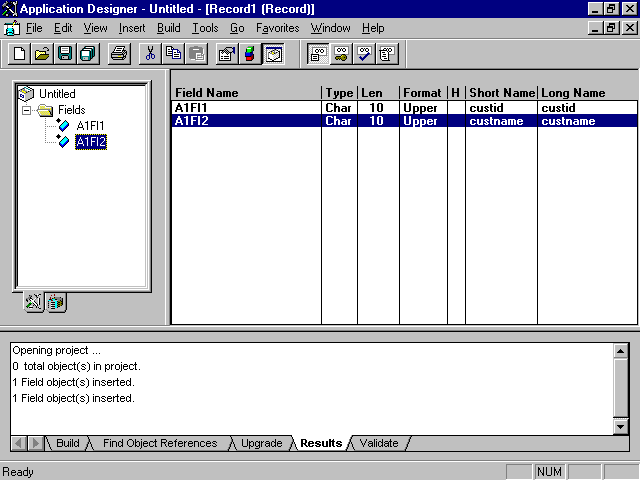
Fig.11: It’s a record! Of two fields.
As seen in fig.11, details of the fields you created are displayed in the record's columns. There is the field name, type, length, format, short name and long name — and if it is hidden or not. That’s the H hiding between Format and Short name. Close and save this object. Since it is a record, name it A1RE1. Once done, it will appear in the left window as usual under a new folder that states Records. Click on the plus sign to the left of the Record folder and there is a single record entry placed there. The plus besides the icon indicates that there is something else hidden beneath. Click the plus to open the branch further and you will see the two fields that you had placed earlier. One must hasten to add, that these fields that you see under the record definition are not to be confused with the fields that are listed under the Fields folder. Although these are the same in type, size etc., the fields under the Record folder are record fields and are distinctly different from just fields.
Try placing a field on a panel and you will know there is a difference. Panels do everything in PeopleSoft. If you have to add something to a record, you use a panel. They are used to display, add, update or correct the data stored in the fields. Even code is associated with objects on a panel, rather than objects alone. There is no way in which you can avoid creating a panel. So begin.
Click File | New | Panel | OK. Your display should look like Fig.12 with maybe one or two exceptions. If the panel on the right does not stretch from edge to edge, then maximise it. The other thing to do is to expand the record branch so that you can access the fields stored with it.

Fig.12: Panel are nothing but boring gray windows.
The grid displayed can be set to whatever value you wish. Though there is no alignment feature, the grid has a Snap To effect to help place objects correctly. The only modifications that you can make are to do with the fields that you place on the panel. Colour them, or change the style of the font used by clicking on Tools | Miscellaneous. The ease with which one can develop an application in PeopleSoft, may make this a very important feature in future. In fact, there has been tremendous scope for upgrading these features in PeopleSoft. Under this menu, you can also set the default buttons that a user will see when he uses the application panel.
Even though the panel is so important, there is little modification possible. The panel cannot be sized nor can it's colour be changed. All you can do is modify the fields placed on the panel. A trick that you may want to remember while working with the field objects is to click and drag the object rather than the text or the label accompanying it.
Try this with the two fields created. Place them anywhere on the panel. Placing fields on a panel is the same as placing fields in records — drag-and-drop the object. This will also be a good time to try placing fields from the Field folder on the page. Record fields do not flag any error when placed on a panel. These record fields get labelled automatically using the names entered when they were defined. However, if you try placing a field on a panel, the label that appears with it is Dummy. Fields that were not part of a record, do not belong to any table and hence cannot be placed for data input or display.

Fig.13: Placing Fields on Panels
There is something more that you have to do. A panel is never used alone in PeopleSoft. Any panel must be a part of a Panel Group . This ‘group’ could be a set of one or more panels that are displayed together. Each panel occupies a full screen and additional panels can also be placed together like continuation sheets. All Actions that work for one panel in a group work for all the other panels in that group.
Now that you know that panels get lonely, what you need to do is to create a group and place the panels in it.
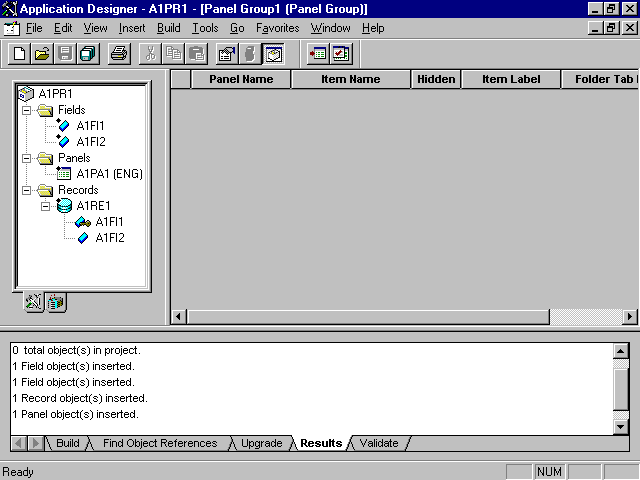
Fig.14: Panel Groups look no different from a Panel list
By now, you should have a sense of déjà vu. Everything that you had done so far, seems to keep getting repeated again and again. Click File | New | Panel Group and OK. The Panel Group list looks like the Panel list a while ago, which also looks like the record definition list that you saw before this. This time you have to drag-and-drop panels. A project could have many panels. Multiple panel groups are allowed. To be of use however, they will have to be linked to some menu item. (Actually, this is not entirely true, as you will find out later on. Hidden panels are sometimes more useful than the ones displayed.)

Fig.15: Collecting panels together in a group
Experiment with the labels that you see in the Panel Group list. The Panel Name is used internally by PeopleSoft and is unique. It cannot be changed here. Item Label identifies the panel to the user, and is used on the panel tab, if there is no Folder Tab Label defined. Between the labels is a checkbox to decide if the panel should be seen or not. You can even do this with a single panel in the application, though it would serve no purpose at all.
We are not done with panel groups yet. Any panel group requires at least one Search record. Do not confuse this with the search key selected when defining the record. Both these are separate and distinct objects. The Search key is a field in the Search record that will be displayed before the user sees a panel. This Search record could be a record that was previously saved and that does not belong to the current project.
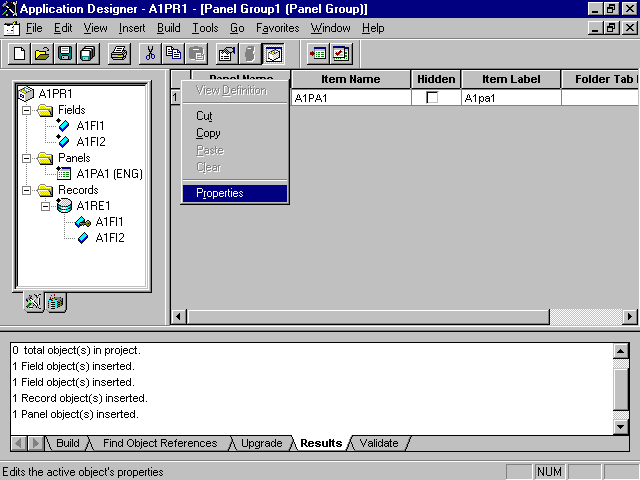
To set it, right-click any panel entry in the panel group and select Properties. This will display a dialog box with two tabs. General information is on the first, while the second — Use, is where you define the Search record. It is here where one defines what Actions can be performed on the panel — Add, Update/Display, Update/Display All, Correction or Data Entry. Check all these boxes so that the corresponding menus are created for the panel group. Therefore, panels are grouped together by the function they perform and according to need.
A couple of other points to note. One, if there is more than one panel in a group, then a small arrow head appears to the right of the menu item. Highlight the menu item and the panels in the panel group are displayed in an additional menu. Two, depending upon the number of tasks that you chose to associate with each panel group, (Add, Update etc.) another arrowhead appears and the list of Actions available are displayed. This list remains constant for all the panels in the panel group. Hence, if you have three panels that form the panel group, there will be three sub-menu items. If only the Add and Correction Actions were selected, then the three sub-menu items will all have an arrow head with the options Add and Correction.
Through the menu select a panel group to work with and you can switch from one panel to the next without a problem. However, only the Action for which the panel set was opened under, works.
You now need to build a menu. For this repeat the procedure used at the beginning — File | New and select Menu instead of Panel Group. Click OK and select Standard. You will now see a standard menu bar appear in the Window on the left. There are menu items already added to the menu bar that appears and items that cannot be modified are grayed. There is a blank menu spot just before Help that you can add your menu to. Click on this spot to select it and then right-click the mouse button. Chose the last item on the popup that appears — Item Properties, and name the menu. If you are a bit puzzled about the fact that you have to define a Name and a Label, do not be. This is not an error. The name refers to the internal notation, or what this particular menu bar will be referred to in PeopleSoft. The label is the text that will appear on the menu bar. Set the Label to read MyMenu, while the Menu Name to anything of your choice it does not make a difference at all. (Nor does the label really, but this is just so that you can match your screen with what is shown here.)
There is still no mention of the panel group in this menu item definition. This is because a top-level menu only opens another menu. Look at your menu bar again, and you will find that there are now two blank spaces for menus, one to the right and another below the top-level menu that you created. The blank menu item below the main menu is where one links the panel group to. Right-click on this space below MyMenu, and select Item Properties. This time the dialog box that pops up is different from the last. You need to specify a Menu Name and Label. The name is not important once more, except that it cannot be the same name that you used in the last menu. Use your name as the label for this menu, if you like. Labels can be repeated without any error. In the next section of the dialog box, leave the selection for Type at Panel Group. The other two options will allow you to associate PeopleSoft code with the menu item directly or to simply place a separator on the menu bar.
Under Panel Group, select the panel group to link with this menu. Even if you know the name of the panel group, for some strange reason you are not allowed to key this in directly. Click the Select button and then from the Open Object dialog box select the panel group you wish to associate. Once you are done with this, save the menu and save your project. Restart PeopleSoft and you will find that the menu you created has been added to the list under Go. Click Go and select your menu option. A new application will start with the menu bar that you created. This will have the menu options and the panels that you defined under the panel group associated with the menu.
None of the Menu Names you entered appear on any of the screens that you see. What will appear, is the name under which you stored the menu. It is this name that gets listed under the main menu Go. You will see it appear again on the top left corner of the application window, when it is selected.
This has been a lengthy procedure, however, it is all that you need to know to create your first PeopleSoft Application or panel. With a little practice you will get faster and better, and will be able to create great looking application windows quickly.
Summary
In this chapter you learned to build a panel that could add, store and modify data in a table. The steps required to do this are as follows.